コンポーネント指向
ここでは、Reactのコンポーネント指向を身につけるための演習を行います。公式サイトのクイックスタート>Reactの流儀を参考に作成しています。
アイコンの説明
- 📝 実践してほしいところ
- 💡 解答例
目次
前提条件
APIからすでに以下のような商品データが取得できていることを前提とします。
[
  { category: "Fruits", price: "$1", stocked: true, name: "Apple" },
  { category: "Fruits", price: "$1", stocked: true, name: "Dragonfruit" },
  { category: "Fruits", price: "$2", stocked: false, name: "Passionfruit" },
  { category: "Vegetables", price: "$2", stocked: true, name: "Spinach" },
  { category: "Vegetables", price: "$4", stocked: false, name: "Pumpkin" },
  { category: "Vegetables", price: "$1", stocked: true, name: "Peas" }
]
画面のモックアップは、以下です。
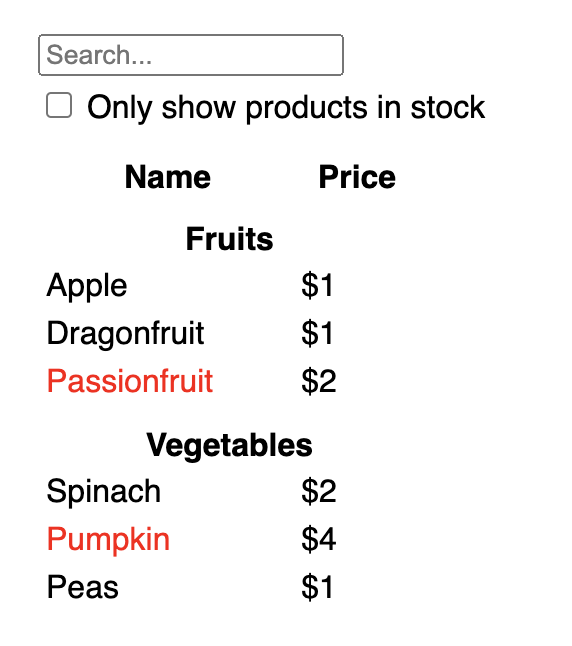
画面の仕様は以下の通りです。
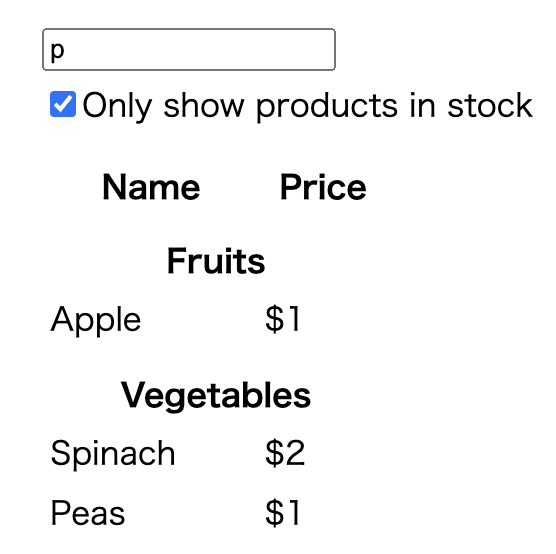
- 検索ボックス
- 文字入力。入力した文字と部分一致する商品だけ表示される。
- チェックボックス
- チェックをつけると
stockedがtrueのものだけ表示される。
- チェックをつけると
- 表
- 条件に当てはまる商品をカテゴリごとに表示する。
- デフォルトでは、全商品を表示する。
stockedがfalseの商品は、名前を赤字で表示する。
準備
コーディングの準備を行います。 以下のコマンドでプロジェクトテンプレートを作成してください。
npm create vite@latest
frameworkはReact, vatiantはTypescript or Typescript + SWCを選択してください。
? Project name: > vite-project
? Select a framework: › - Use arrow-keys. Return to submit.
    Vanilla
    Vue
❯   React
    Preact
    Lit
    Svelte
    Solid
    Qwik
    Others
? Select a variant: › - Use arrow-keys. Return to submit.
❯   TypeScript
    TypeScript + SWC
    JavaScript
    JavaScript + SWC
また、ここではstyleについては、演習の対象としていないので、index.cssを以下のように変更してください。
src/index.css
body {
  font-family: sans-serif;
  margin: 20px;
  padding: 5px;
}

label {
  display: block;
  margin-top: 5px;
  margin-bottom: 5px;
}

th {
  padding-top: 10px;
}

td {
  padding: 2px;
  padding-right: 40px;
}
商品情報はAppコンポーネントが持っていることとします。src/App.tsxを以下のように修正してください。
src/App.tsx
export interface Product {
  category: string;
  price: string;
  stocked: boolean;
  name: string;
}

function App() {
  const products: Product[] = [
    { category: "Fruits", price: "$1", stocked: true, name: "Apple" },
    { category: "Fruits", price: "$1", stocked: true, name: "Dragonfruit" },
    { category: "Fruits", price: "$2", stocked: false, name: "Passionfruit" },
    { category: "Vegetables", price: "$2", stocked: true, name: "Spinach" },
    { category: "Vegetables", price: "$4", stocked: false, name: "Pumpkin" },
    { category: "Vegetables", price: "$1", stocked: true, name: "Peas" },
  ];
  return <></>;
}

export default App;
コンポーネントに分割する
モックアップの画面をコンポーネントに分割し、コンポーネントの名前を付けてみましょう。分割の仕方は、人によって様々です。設計や実装する他の画面などによっても変わってきます。
ただし、コンポーネント分割を行う際は、単一責任の原則(1つのコンポーネントは、1つのことだけを行う)を意識して、分割していきましょう。
📝 モックアップ画面を見ながら、コンポーネントに分割してみましょう!
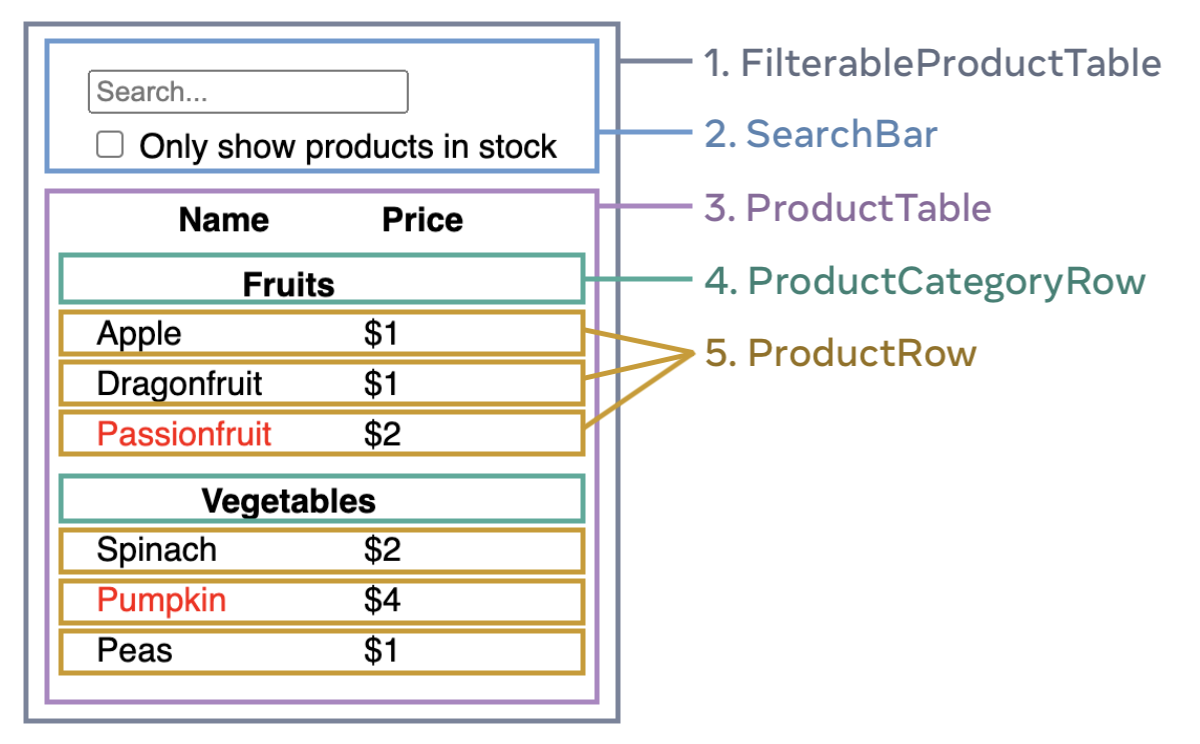
💡分割例
ここからは、以下の画像のようにコンポーネントを分割したと仮定して、話を進めていきます。
画面全体のDOM構成を考える
画面がどのようなDOMで構成されているのかを考えます。慣れないうちは、コードを書きながらでも良いです。
📝 モックアップ画面を見ながら、DOMの構成を考えてみましょう!
💡DOM構成の例
画面全体のDOMのイメージ
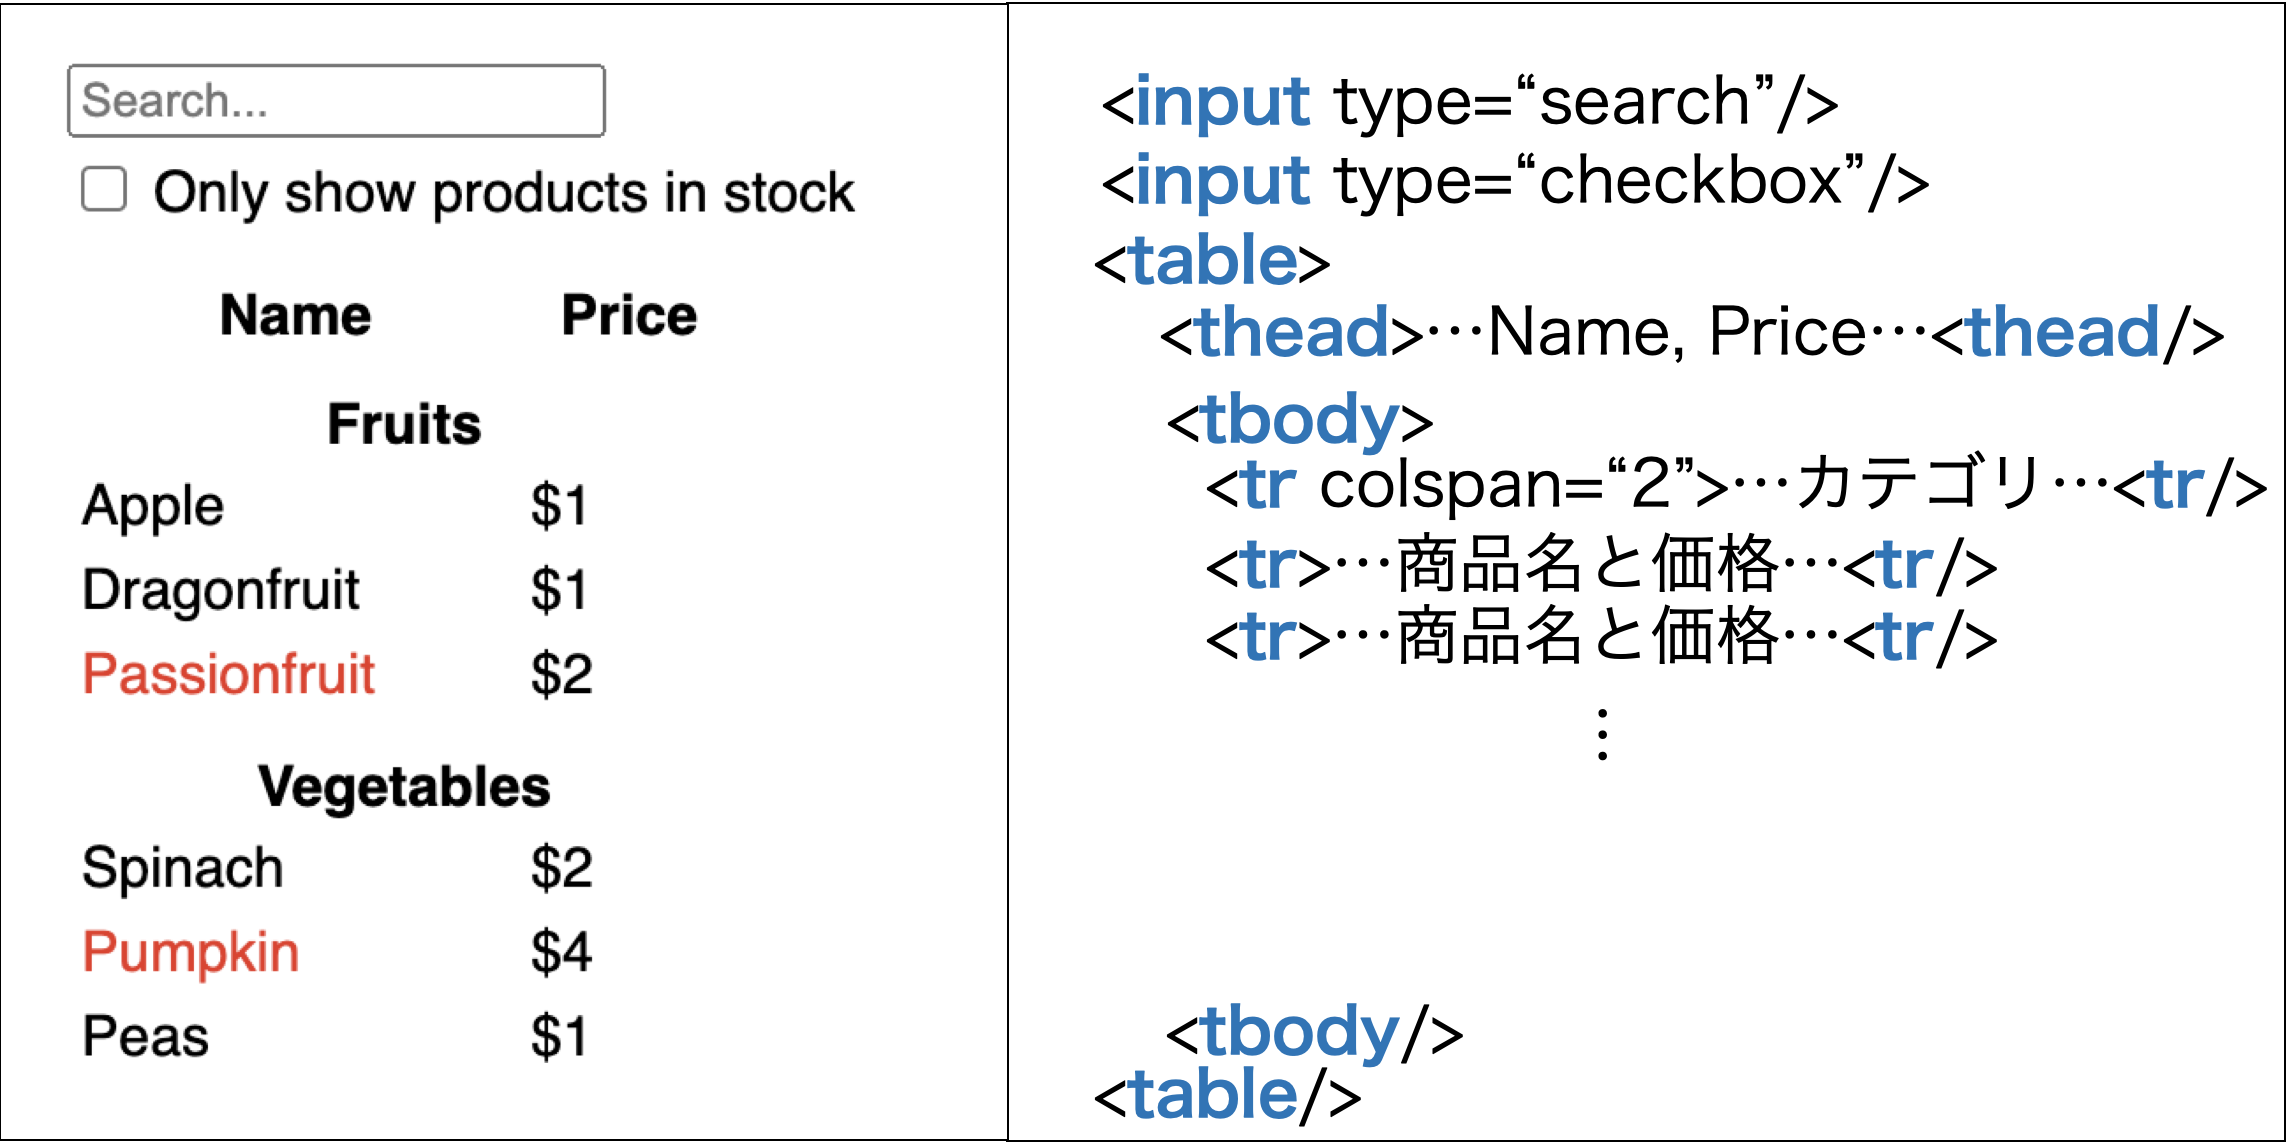
実際にhtmlを書いてみると以下のようになります。
<input type="search" />
<label>
  <input type="checkbox" />
  Only show products in stock
</label>

<table>
  <thead>
    <tr>
      <th>Name</th>
      <th>Price</th>
    </tr>
  </thead>
  <tbody>
    <tr>
      <th colspan="2">Fruits</th>
    </tr>
    <tr>
      <td>Apple</td>
      <td>$1</td>
    </tr>
  </tbody>
</table>
静的な画面を実装する
まずは、ユーザーの入力によって表示が変わる部分などは考慮せず、商品全てが表示される画面を作っていきましょう。
初めのうちは、末端の子コンポーネントから実装していくのではなく、ある程度上の親コンポーネントから実装し、後で細かくコンポーネントに分離させてゆくのが、実装しやすいです。
📝 各コンポーネントを実装してみましょう!
💡静的なProductTableコンポーネントの実装例(初心者向け)
ProductTableコンポーネントを具体例として、実装していきましょう。
準備
まずは、ProductTableコンポーネントとその親コンポーネントを定義するファイルを作っていきましょう。また、Appコンポーネントが持っているproductsをpropsで渡して、ProductTableが受け取れるようにしましょう。
src/components/ProductTable.tsx
import { Product } from "../App";

interface ProductTableProps {
  products: Product[];
}

const ProductTable: React.FC<ProductTableProps> = ({ products }) => {
  return <></>;
};

export default ProductTable;
src/components/FilterableProductTable.tsx
import { Product } from "../App";
import ProductTable from "./ProductTable";

interface FilterableProductTableProps {
  products: Product[];
}

const FilterableProductTable: React.FC<FilterableProductTableProps> = ({
  products,
}) => {
  return <ProductTable products={products} />;
};

export default FilterableProductTable;
そして、Appコンポーネントを以下のように修正します。
src/App.tsx
import FilterableProductTable from "./components/FilterableProductTable";

export interface Product {
  category: string;
  price: string;
  stocked: boolean;
  name: string;
}

function App() {
  const products: Product[] = [
    { category: "Fruits", price: "$1", stocked: true, name: "Apple" },
    { category: "Fruits", price: "$1", stocked: true, name: "Dragonfruit" },
    { category: "Fruits", price: "$2", stocked: false, name: "Passionfruit" },
    { category: "Vegetables", price: "$2", stocked: true, name: "Spinach" },
    { category: "Vegetables", price: "$4", stocked: false, name: "Pumpkin" },
    { category: "Vegetables", price: "$1", stocked: true, name: "Peas" },
  ];
  return <FilterableProductTable products={products} />;
}

export default App;
ProductTableを子コンポーネント無しで実装
それでは、ProductTableを子コンポーネント無しで実装していきます。基本的には、画面全体のDOM構成を考えるで記述したhtmlのtableタグ部分になりますが、表の中身はproductsを使って構成していきましょう。
src/components/ProductTable.tsx
import { Product } from "../App";

interface ProductTableProps {
  products: Product[];
}

const ProductTable: React.FC<ProductTableProps> = ({ products }) => {
  // category一覧を作成
  const categories = products.reduce<string[]>((prev, current) => {
    if (!prev.includes(current.category)) prev.push(current.category);
    return prev;
  }, []);

  return (
    <table>
      <thead>
        <tr>
          <th>Name</th>
          <th>Price</th>
        </tr>
      </thead>
      <tbody>
        {categories.map((category) => {
          // カテゴリに属する商品をピックアップ
          const categoryProducts = products.filter(
            (product) => product.category === category
          );
          return (
            <>
              {/* カテゴリの表示 */}
              <tr key={category}>
                <th colSpan={2}>{category}</th>
              </tr>
              {/* 名前、価格の表示 */}
              {categoryProducts.map((product) => (
                <tr key={product.name}>
                  <td style={{ color: product.stocked ? undefined : "red" }}>
                    {product.name}
                  </td>
                  <td>{product.price}</td>
                </tr>
              ))}
            </>
          );
        })}
      </tbody>
    </table>
  );
};

export default ProductTable;
上記で実装したProductTableコンポーネントを別のコンポーネントにしていく部分を探します。以下のtbodyタグに指定している部分であることは、すぐ分かると思います。
<tbody>
  {categories.map((category) => {
    const categoryProducts = products.filter(
      (product) => product.category === category
    );
    return (
      <>
        {/* ProductCategoryRowコンポーネント */}
        <tr key={category}>
          <th colSpan={2}>{category}</th>
        </tr>
        {/* ProductRowコンポーネント */}
        {categoryProducts.map((product) => (
          <tr key={product.name}>
            <td style={{ color: product.stocked ? undefined : "red" }}>
              {product.name}
            </td>
            <td>{product.price}</td>
          </tr>
        ))}
      </>
    );
  })}
</tbody>
ProductTableを子コンポーネント有りで実装
ProductCategoryRowとProductRowコンポーネントを実装していきましょう。
src/components/ProductCategoryRow.tsx
interface ProductCategoryRowProps {
  category: string;
}

const ProductCategoryRow: React.FC<ProductCategoryRowProps> = ({
  category,
}) => {
  return (
    <tr>
      <th colSpan={2}>{category}</th>
    </tr>
  );
};

export default ProductCategoryRow;
src/components/ProductRow.tsx
interface ProductRowProps {
  name: string;
  price: string;
  isStocked: boolean;
}

const ProductRow: React.FC<ProductRowProps> = ({ name, price, isStocked }) => {
  return (
    <tr>
      <td style={{ color: isStocked ? undefined : "red" }}>{name}</td>
      <td>{price}</td>
    </tr>
  );
};

export default ProductRow;
次にProductCategoryRowとProductRowコンポーネントを使ってProductTableコンポーネントを書き換えていきます。
import { Product } from "../App";
import ProductCategoryRow from "./ProductCategoryRow";
import ProductRow from "./ProductRow";

interface ProductTableProps {
  products: Product[];
}

const ProductTable: React.FC<ProductTableProps> = ({ products }) => {
  // category一覧を作成
  const categories = products.reduce<string[]>((prev, current) => {
    if (!prev.includes(current.category)) prev.push(current.category);
    return prev;
  }, []);

  return (
    <table>
      <thead>
        <tr>
          <th>Name</th>
          <th>Price</th>
        </tr>
      </thead>
      <tbody>
        {categories.map((category) => {
          // カテゴリに属する商品をピックアップ
          const categoryProducts = products.filter(
            (product) => product.category === category
          );
          return (
            <>
              {/* カテゴリの表示 */}
              <ProductCategoryRow category={category} key={category} />
              {/* 名前、価格の表示 */}
              {categoryProducts.map((product) => (
                <ProductRow
                  name={product.name}
                  price={product.price}
                  isStocked={product.stocked}
                />
              ))}
            </>
          );
        })}
      </tbody>
    </table>
  );
};

export default ProductTable;
これで、ProductTableコンポーネントとその子コンポーネントの実装は完了です。
💡全コンポーネントの実装例
以下に、全てのコンポーネントの実装例を示します。
src/App.tsx
import FilterableProductTable from "./components/FilterableProductTable";

export interface Product {
  category: string;
  price: string;
  stocked: boolean;
  name: string;
}

function App() {
  const products: Product[] = [
    { category: "Fruits", price: "$1", stocked: true, name: "Apple" },
    { category: "Fruits", price: "$1", stocked: true, name: "Dragonfruit" },
    { category: "Fruits", price: "$2", stocked: false, name: "Passionfruit" },
    { category: "Vegetables", price: "$2", stocked: true, name: "Spinach" },
    { category: "Vegetables", price: "$4", stocked: false, name: "Pumpkin" },
    { category: "Vegetables", price: "$1", stocked: true, name: "Peas" },
  ];

  return (
    <div>
      <FilterableProductTable products={products} />
    </div>
  );
}

export default App;
src/components/FilterableProductTable.tsx
import { Product } from "../App";
import ProductTable from "./ProductTable";
import SearchBar from "./SearchBar";

interface FilterableProductTableProps {
  products: Product[];
}

const FilterableProductTable: React.FC<FilterableProductTableProps> = ({
  products,
}) => {
  return (
    <div>
      <SearchBar />
      <ProductTable products={products} />
    </div>
  );
};

export default FilterableProductTable;
src/components/SearchBar.tsx
interface SearchBarProps {}

const SearchBar: React.FC<SearchBarProps> = () => {
  return (
    <div>
      <input type="search" />
      <label>
        <input type="checkbox" />
        Only show products in stock
      </label>
    </div>
  );
};

export default SearchBar;
src/components/ProductTable.tsx
import { Product } from "../App";
import ProductCategoryRow from "./ProductCategoryRow";
import ProductRow from "./ProductRow";

interface ProductTableProps {
  products: Product[];
}

const ProductTable: React.FC<ProductTableProps> = ({ products }) => {
  // category一覧を作成
  const categories = products.reduce<string[]>((prev, current) => {
    if (!prev.includes(current.category)) prev.push(current.category);
    return prev;
  }, []);

  return (
    <table>
      <thead>
        <tr>
          <th>Name</th>
          <th>Price</th>
        </tr>
      </thead>
      <tbody>
        {categories.map((category) => {
          // カテゴリに属する商品をピックアップ
          const categoryProducts = products.filter(
            (product) => product.category === category
          );
          return (
            <>
              {/* カテゴリの表示 */}
              <ProductCategoryRow category={category} key={category} />
              {/* 名前、価格の表示 */}
              {categoryProducts.map((product) => (
                <ProductRow
                  name={product.name}
                  price={product.price}
                  isStocked={product.stocked}
                />
              ))}
            </>
          );
        })}
      </tbody>
    </table>
  );
};

export default ProductTable;
src/components/ProductCategoryRow.tsx
interface ProductCategoryRowProps {
  category: string;
}

const ProductCategoryRow: React.FC<ProductCategoryRowProps> = ({
  category,
}) => {
  return (
    <tr>
      <th colSpan={2}>{category}</th>
    </tr>
  );
};

export default ProductCategoryRow;
src/components/ProductRow.tsx
interface ProductRowProps {
  name: string;
  price: string;
  isStocked: boolean;
}

const ProductRow: React.FC<ProductRowProps> = ({ name, price, isStocked }) => {
  return (
    <tr>
      <td style={{ color: isStocked ? undefined : "red" }}>{name}</td>
      <td>{price}</td>
    </tr>
  );
};

export default ProductRow;
Stateを保持するコンポーネントを考える
Stateを保持するコンポーネントを考えるには、以下のステップで行っていきます。
- 保持するべきStateを見つける
- Stateを使うコンポーネントを見つける
- それらのコンポーネントの共通の親を見つける
この手順で見つけた親コンポーネントが、Stateを保持するコンポーネントです。
保持するべきStateを見つける
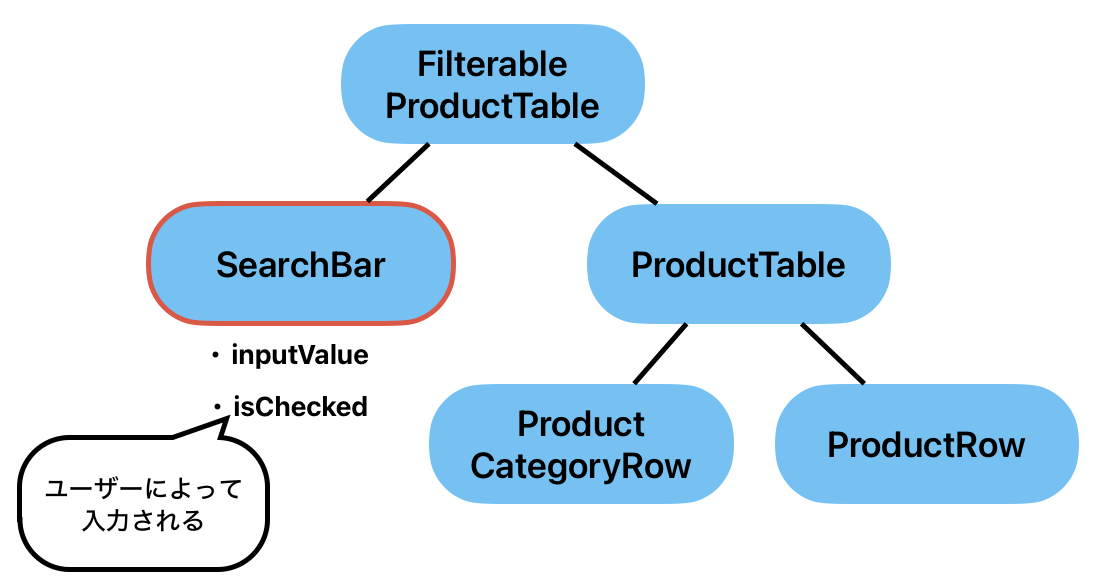
はじめに、この画面が保持するべきStateを挙げていきましょう。保持するべきStateは、ユーザーによって変更が行われる箇所もしくは、外部のAPIなどから入手するデータがほとんどです。
今回、APIから入手するデータは、定数として考えるので、ユーザーによって変更が行われる箇所を見てみましょう。
📝 ユーザーによって変更が行われる箇所に注目して、保持するべきStateを考えてみましょう!
💡保持するべきStateは、SearchBarコンポーネント内のinputの内容とcheckboxのチェックの状態だと分かります。
Stateを使うコンポーネントを見つける
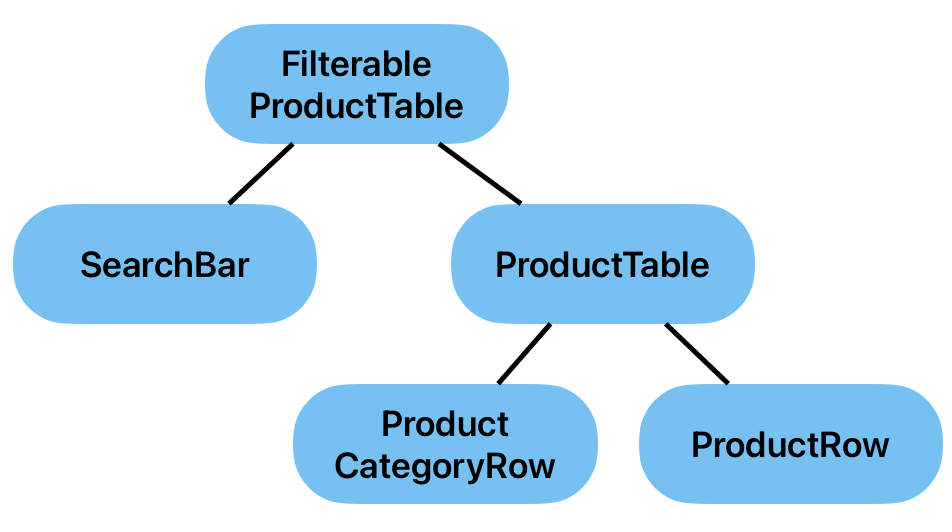
次に、コンポーネントの親子関係をはっきりさせるために、コンポーネントツリーを考えてみましょう。コンポーネントツリーとは、コンポーネントを木構造にしたもので、親コンポーネントが親ノード、子コンポーネントが子ノードになります。
📝 FilterableProductTableコンポーネントを根ノードとして、コンポーネントツリーを書いてみましょう!
💡FilterableProductTableコンポーネントを根ノードとして、コンポーネントツリーを書くと以下のようになります。
Stateを保持するべきコンポーネントは、そのStateを利用する全てのコンポーネントの共通の親コンポーネントになります。
今回、保持するべき値は、inputの内容とcheckboxのチェックの状態です。これらを利用するコンポーネントを考えていきましょう。
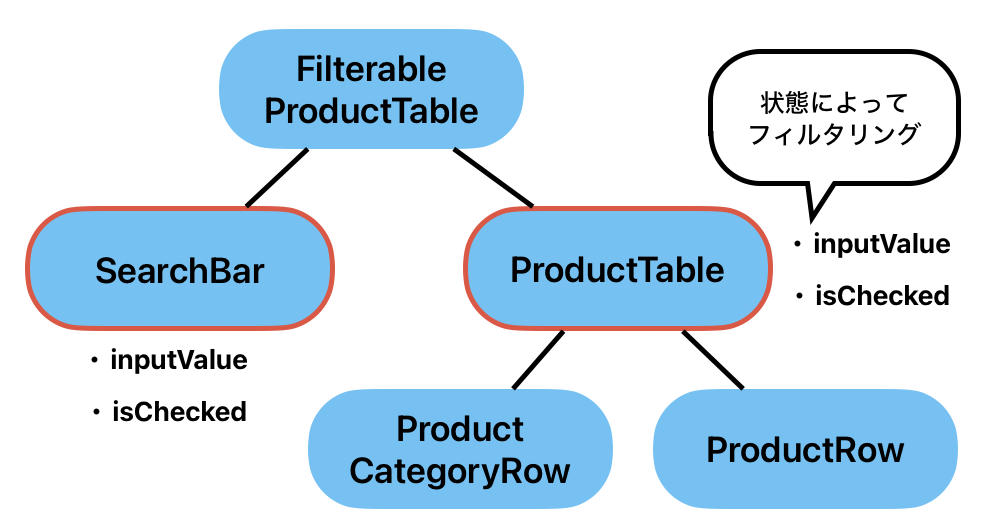
📝 inputの内容とcheckboxのチェックの状態を利用するコンポーネントは、どれか考えてみましょう!
ユーザーが入力する部分のSearchBarコンポーネントが利用することは、すぐに分かるかと思います。それでは、他にそのStateを利用するコンポーネントは、どれでしょうか?
それは、ProductTableコンポーネントです。ProductTableコンポーネントは、inputの内容とcheckboxのチェックの状態に応じて、表示する子コンポーネントを変更する必要があります。
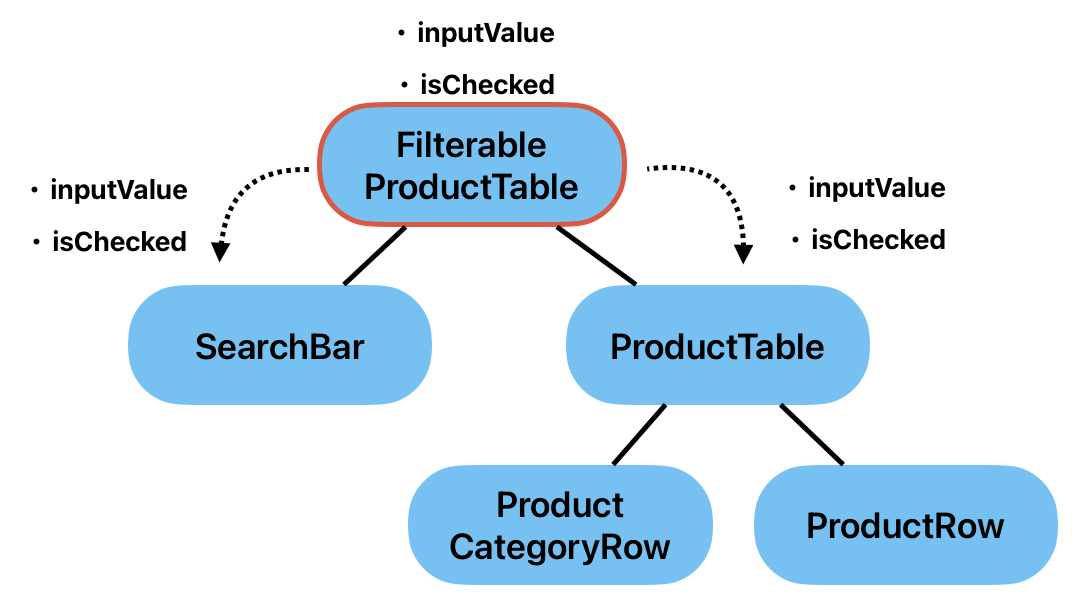
それらのコンポーネントの共通の親を見つける
📝 それでは、SearchBarコンポーネントとProductTableコンポーネントの共通の親コンポーネントを見つけましょう!
💡コンポーネントツリーをみると簡単に分かります。共通の親コンポーネントは、FilterableProductTableです。このコンポーネントで、useStateを使って、inputの内容とcheckboxのチェックの状態を保持し、propsでそれらのstateを子コンポーネントに渡しましょう。
動的な画面を実装する
まずは、FilterableProductTableコンポーネントでuseStateを使って、inputの内容とcheckboxのチェックの状態を保持しましょう。
src/components/FilterableProductTable.tsx
import { useState } from "react";
import { Product } from "../App";
import ProductTable from "./ProductTable";
import SearchBar from "./SearchBar";

interface FilterableProductTableProps {
  products: Product[];
}

const FilterableProductTable: React.FC<FilterableProductTableProps> = ({
  products,
}) => {
  const [filterText, setFilterText] = useState("");
  const [inStockOnly, setInStockOnly] = useState(false);

  return (
    <div>
      <SearchBar />
      <ProductTable products={products} />
    </div>
  );
};

export default FilterableProductTable;
ここから、保持した状態をSearchBarとProductTableコンポーネントにprops経由で渡し、SearchBarでは状態の更新を行い、ProductTableは、状態に応じてproductsをフィルタリングしましょう。
📝 それでは、実際にsrc/components/FilterableProductTable.tsx、src/components/SearchBar.tsx、src/components/ProductTable.tsxを変更し、フィルタリングができるようにしましょう。
以下にコメントでヒントを書いています。
src/components/FilterableProductTable.tsx
// 省略

const FilterableProductTable: React.FC<FilterableProductTableProps> = ({
  products,
}) => {
  const [filterText, setFilterText] = useState("");
  const [inStockOnly, setInStockOnly] = useState(false);

  return (
    <div>
      {/** SearchBarに必要な状態をpropsで渡す */}
      <SearchBar />
      {/** ProductTableに必要な状態をpropsで渡す */}
      <ProductTable products={products} />
    </div>
  );
};

export default FilterableProductTable;
src/components/SearchBar.tsx
interface SearchBarProps {
  /** propsで必要な状態を受け取れるようにする */
}

const SearchBar: React.FC<
  SearchBarProps
> = (/** propsで必要な状態を受け取る */) => {
  return (
    <div>
      {/* 状態とその更新処理を紐付ける */}
      <input type="search" />
      <label>
        {/* 状態とその更新処理を紐付ける */}
        <input type="checkbox" />
        Only show products in stock
      </label>
    </div>
  );
};

export default SearchBar;
src/components/ProductTable.tsx
import { Product } from "../App";
import ProductCategoryRow from "./ProductCategoryRow";
import ProductRow from "./ProductRow";

interface ProductTableProps {
  products: Product[];
  /** propsで必要な状態を受け取れるようにする */
}

const ProductTable: React.FC<ProductTableProps> = ({
  products /** propsで必要な状態を受け取る */,
}) => {
  // productsを状態に応じてフィルタリングする

  // 以下ではフィルタリングしたproductsを使って、同様の処理を行う

  // category一覧を作成
  const categories = products.reduce<string[]>((prev, current) => {
    if (!prev.includes(current.category)) prev.push(current.category);
    return prev;
  }, []);

  return (
    <table>
      {/* 省略 */}
    </table>
  );
};

export default ProductTable;
💡実装例
変更するコンポーネントのみ記載しています。
src/components/FilterableProductTable.tsx
import { useState } from "react";
import { Product } from "../App";
import ProductTable from "./ProductTable";
import SearchBar from "./SearchBar";

interface FilterableProductTableProps {
  products: Product[];
}

const FilterableProductTable: React.FC<FilterableProductTableProps> = ({
  products,
}) => {
  const [filterText, setFilterText] = useState("");
  const [inStockOnly, setInStockOnly] = useState(false);

  return (
    <div>
      <SearchBar
        filterText={filterText}
        setFilterText={setFilterText}
        inStockOnly={inStockOnly}
        setInStockOnly={setInStockOnly}
      />
      <ProductTable
        products={products}
        filterText={filterText}
        inStockOnly={inStockOnly}
      />
    </div>
  );
};

export default FilterableProductTable;
src/components/SearchBar.tsx
interface SearchBarProps {
  filterText: string;
  setFilterText: React.Dispatch<React.SetStateAction<string>>;
  inStockOnly: boolean;
  setInStockOnly: React.Dispatch<React.SetStateAction<boolean>>;
}

const SearchBar: React.FC<SearchBarProps> = ({
  filterText,
  setFilterText,
  inStockOnly,
  setInStockOnly,
}) => {
  return (
    <div>
      <input
        type="search"
        value={filterText}
        onChange={(e) => {
          setFilterText(e.target.value);
        }}
      />
      <label>
        <input
          type="checkbox"
          checked={inStockOnly}
          onChange={() => {
            setInStockOnly((prev) => !prev);
          }}
        />
        Only show products in stock
      </label>
    </div>
  );
};

export default SearchBar;
src/components/ProductTable.tsx
import { Product } from "../App";
import ProductCategoryRow from "./ProductCategoryRow";
import ProductRow from "./ProductRow";

interface ProductTableProps {
  products: Product[];
  filterText: string;
  inStockOnly: boolean;
}

const ProductTable: React.FC<ProductTableProps> = ({
  products,
  filterText,
  inStockOnly,
}) => {
  // productsを状態に応じてフィルタリングする
  const filteredProducts = products
    .filter((product) => product.name.toLowerCase().includes(filterText))
    .filter((products) => (inStockOnly ? products.stocked : true));

  // category一覧を作成
  const categories = filteredProducts.reduce<string[]>((prev, current) => {
    if (!prev.includes(current.category)) prev.push(current.category);
    return prev;
  }, []);

  return (
    <table>
      <thead>
        <tr>
          <th>Name</th>
          <th>Price</th>
        </tr>
      </thead>
      <tbody>
        {categories.map((category) => {
          // カテゴリに属する商品をピックアップ
          const categoryProducts = filteredProducts.filter(
            (product) => product.category === category
          );
          return (
            <>
              {/* カテゴリの表示 */}
              <ProductCategoryRow category={category} key={category} />
              {/* 名前、価格の表示 */}
              {categoryProducts.map((product) => (
                <ProductRow
                  name={product.name}
                  price={product.price}
                  isStocked={product.stocked}
                />
              ))}
            </>
          );
        })}
      </tbody>
    </table>
  );
};

export default ProductTable;
これでフィルタリングができるようになりました。